


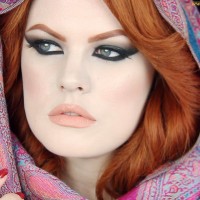
Classic cat-eye
Eyeliner can be an ever changing accessory to any makeup look and with dozens of colors and products to choose from. The trick to obtaining this classic look is being able to cultivate the right techniques to acquire a precise application and a long lasting finish.
Some of my favorite liquid liners (and I have experimented with many) are the MAC Penultimate and the Stila Waterproodf Liquid Liner in Black. I have tried using several different drug store brand liquid liners and they all seem to leave a very crinkly, vinyl finish. I prefer the traditional, solid black look so these two products have definitely made it to the top of my list for liner must haves. Not only do they have incredibly fine tips which makes them easier to use for beginners, but they’re long lasting. If you’re anything like me and have horrible allergies or weeping eyes, then opt for the Stila Waterproof liner.

Stila Waterprood Liquid Liner - a staple in my kit
The best tip I can give you when it comes to liquid eye liner is to practice. There are numerous methods to applying it and the trick is finding what works for you. Utilizing a piece of card or stiff paper as a guide can help to achieve precise lines and symmetry in your eyeliner. This is also a blessing if you don’t have steady hands and want to use the card to draw in a tail end with a white eye liner as a stencil before you begin. A white kohl pencil is easily washed away and can aid in practicing the straight lines needed to create a really clean look.

MAC Eye Kohl in Fascinating

MAC 210 brush
As for cream liners and cake liners I think one of the biggest obstacles is finding a brush that has a thin enough tip to give you that crisp finish every time. Some eyeliner brushes are too flimsy and this makes it easy to end up with a blunt edge and crooked edges. I’ve found that the MAC 210 brush is fine enough to achieve any look, whether it be inspired by a vintage classic or something for everyday. If you’re on a budget, the Sigma SS210 is a more than worthy alternative.
I’ve always preferred cake liners over the cream variety, so my favorite one that I have tried is the Ben Nye cake liner in black. In the past, I have noticed that when wearing shimmery eye shadows the glitter tends to transfer onto your liner and make it appear more dull. I haven’t had this problem with the Ben Nye Cake liner and that makes it stand out among the rest. A quick tip that I find works is to add a makeup sealant after applying the liner. Not only will it make it waterproof, but it will stay in place all night long.
Don’t worry if you make a mistake. The best way to ensure your liner is looking its best is to saturate a q-tip with some makeup remover and run it underneath the tail end for a really sharp edge. Another method you can use is to take an angled brush dipped in your concealer of choice and run it along the rigid edge. Use some translucent powder to set the concealer and you should be on your way to achieving a polished and neat look. Please feel free to leave a comment if you have any questions.

Ben Nye Cake Liner
Products and tools used:
- MAC Peniltimate - Rapidblack
- Benefit Babe Cake duo - black
- Sigma SS210
- Makeup Designory #210 angled liner brush
Pair your cat eye liner with the perfect red lip for a flawless vintage look!

at 12:39 am
Which foundation and colour were you using in this video?
at 7:46 am
Smashbox Studio Skin in 1.1
at 8:59 am
I love this video. I was also going to ask what foundation you were wearing. Haha.
But now I have another question. Your hair naturally seems dark as mine.. and Im a dyed redhead too, but my color washes out to Marigold.. In a matter of a few weeks.. A real unpleasant Red/blonde color. I used the Paul Mitchell 6RO. What do you use?
at 6:38 am
Thank you! My colorist uses L’Oreal Professionnel dye in level 6.45 and level 7.45 mixed together with a copper booster. I also wait a while in between washes and use a dry shampoo in the meantime. Also, make sure to always wash your hair in cold water and use a professional level color saving shampoo! Hope this helps
at 2:07 am
You are the most gorgeous redhead, I have to say.
Thanks for sharing your makeup and beauty tricks! I always look forward to your videos.
Now I feel like dying my hair red! lol 😀
at 6:01 am
Thank you so much! That is very nice of you to say. I love doing it! x
at 4:53 am
This is a great site! What lipstick are you wearing? Thanks.
at 3:38 am
Thank you so much! It’s from a Cinema Secrets palette I won twitter. I’m not sure what the name is because there is no label. So sorry!
at 10:07 pm
I can make one eye look good but I have the hardest time making them even. Any tips?
at 7:15 pm
My eyes are really round and big and am not sure if doing the cat-eye liner makes them look good or bad??? Any suggestions?? :/
at 6:49 pm
I have a question about your hair… before you die, you need discolor your hair?
Thanks!
at 6:50 pm
ops… dye…hahaha
at 1:41 pm
I think it will look fantastic! My suggestion would be to make the line fairly thin. The thicker you make the liner on the centre part of your lid, the more round it will make your eye look. Begin very thin at the inner corner of your eye and try to make the liner the same height all the way across. I hope this helps!
at 1:42 pm
I did have to strip my hair of the colour before going red. I used to have black hair, so essentially they bleach it and progressively dyed my hair more copper each time.
at 10:58 am
Hello Ashley! Great post as always!
But there’s something I don’t still understand. I have been using liquid liners all this time, but I want to go a step further into cake eyeliners. But what is the difference between cake and gel/cream eyeliners? Are they meant to be used in different ways?
You say you prefer cake ones, is for any special reason? Thanks!
at 11:00 am
That’s a beautiful lipstick you’re wearing, what is it??
at 1:37 pm
If you use a piece of card or something with a straight edge, you could trace the diagonal line along side it. That will give you a really crisp line to start with. To make them as symmetrical as you can, create a small dot with the brush where you want the line to end and make note of what’s above the dot. So, when you go and do the other side, you can quickly recognize at what part the line should end and make a dot on that side as well. I hope this is helpful
at 1:40 pm
Thanks Poppy! Cake liners are activated by water. They have a more fluid consistency, so I find they glide on better. Gel liners can become cakey and even dry up, so I find it can be difficult for beginners to make a really crisp line. The cake liners also tend to be more opaque. The Ben Nye cake liner is a really matte black color, so it looks dramatic and doesn’t have that awful shiny finish to it. You can also add a sealant to your cake liner which makes it waterproof. I have bad allergies so this really helps to keep it on all day!
at 1:43 pm
Hi Drew!
It’s from a Cinema Secrets Palette that I won online, but it doesn’t seem to have a number or name on it. The closest one I can find on the site is the LPK12 Bubbly Gum palette!
at 9:36 am
Hi Ash! I really adore your tutorials and advices and tips. And I appreciated this tutorial particurally cuz it’s zone of my fave ways to wear every day make up!
I Justin wanted to ask you what do you think about benefit magic ink jet black in front of the Mac and Stila ones. Thanx for your attention and keep being so original and rockin cool with your tutorials!
at 9:37 am
I wanted to write “one of my fave” and “just a question” ^_^ sorry ;p
at 5:07 pm
Hi Musydora!
First off, thank you for the kind words. It’s great to know that people find my videos helpful. It’s one of my everyday go-to looks as well. It’s simple, yet classic! I don’t mind the Benefit Magic Ink liquid liner. I’ve used it a few times and it does create a very opaque black line. It can create a bit of a vinyl-like sheen if too much is applied, but other then that it’s great. I would say it’s right up there with both MAC and Stila! x
at 5:56 pm
I love the way you putting eyeliner , it was helpful I didn’t know how to start putting it . Now I know but I haven’t tried yet